At 6k miles I did the first
tire swap. While in there I checked the splines to be sure everything
looked okay. This is what the Yamaha assembly drones consider sufficient
for the job. After initially writing about this, some other Feejer owners
have e-mailed me and told me their's was just as "dry". It's
not a good thing, folks. Check your splines each time you do a tire
swap. It's quick and easy and can save you a load of heartache over
the life of the bike.
1. Get a factory service manual. It's cheap
insurance.
2. Remove rear wheel (including
brake caliper from rotor, etc.)
3. Remove the 4 acorn nuts
to the front of the rear drive "pumpkin" where it bolts to
the swing arm.
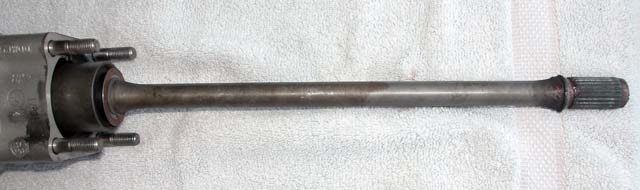
4. Carefully pull the assembly straight
backward. The shaft will come with the pumpkin.
5. [3rd Update 6/25/06] After much discussion,
debate, and opposing opinions*, it has been confirmed that the rear
drive shaft splines ARE lubed by the final drive gear oil (in the "pumpkin").
Even so, it is adviseable that you service
the rear drive shaft splines and oil seal #2 occasionally.
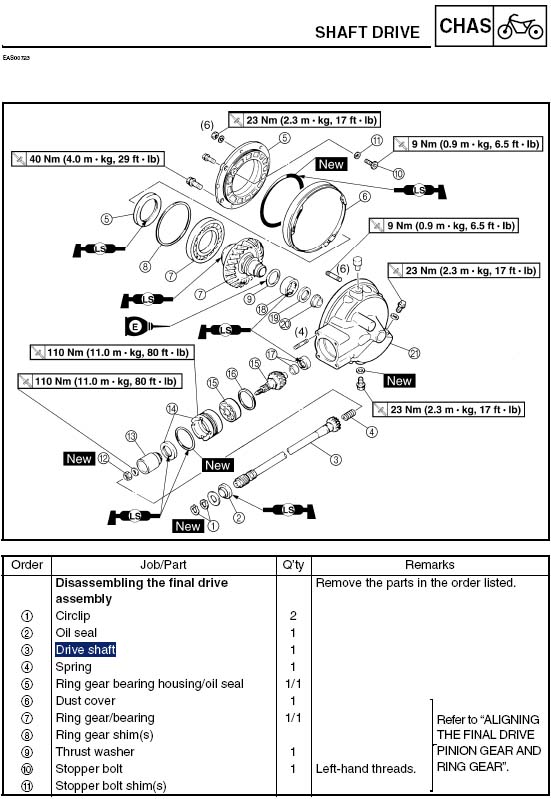
There's a circlip (#1), an oil seal (#2)
that do not need to be removed to pull the shaft from the pumpkin (the
shaft is a friction fit). You can service them in place on the shaft
once it's pulled. If you do R&R them, replace them carefully to
prevent damage. There's also a spring (# 4) between the rear of the
shaft and the front of the "pumpkin" that needs to kept under
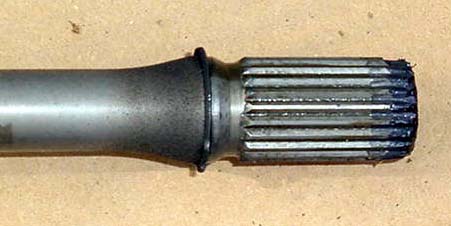
control and reinstalled when reassembling. Servicing the splines at
the front & rear of drive shaft, male and female splines of the
rear wheel assembly, the engine output shaft, and the u-joint are vital.
For the front drive shaft splines and the rear wheel hub (drive and
driven splines), cleaning and lubing with Honda
Moly 60 Paste can't be emphasized strongly enough. Oil seals #2
and #14 are identified as needing "lithium soap base grease".
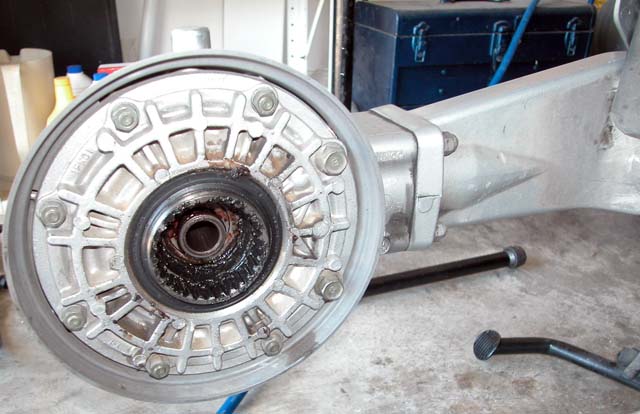
Previously-Serviced Rear Hub Splines
At Tire Swap
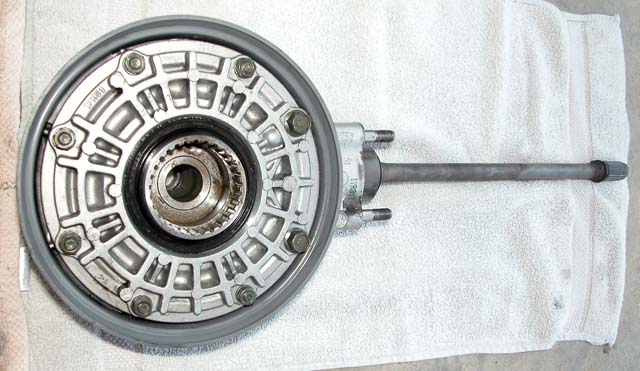
Rear Hub Splines Cleaned & Ready For Honda Moly 60 Paste
6. Clean and lube the front splines &
clean the rear splines and lube seal #2. I found that Mobile Super Syn
grease was the exact same color and consistency as that already on the
front splines from the factory. With BMW and others re-labeling Mobile
synth products, my bet this is the same story with Yamaha's rear pumpkin
"magic juice" they sell for $38 a pint. Clean/lube the rear
hub splines (drive & driven) while the tire is out too.
7. Cleaning the splines
before slathering more lube on them is important to reduce the abrasion
that dirt and grit causes.
8. While Mobile Synth lube is okay and appears
to match the slight hint of lube used by the factory, Honda Moly
60 Paste is the preferred choice. For years Gold Wing riders have
known how great this product is. Many non-Honda shops use it too. The
high moly content means that it resists the high temperatures and pressures
to which drive line components are subjected. It's less likely to flow
away from the areas needing protection; even when stressed under extreme
use. Many a Wingster has found their splines crumble to dust if neglected.
If Honda Moly 60 can hold up under the stress of a fully-loaded Wing,
(2-up, pulling an overloaded trailer), then it should be okay for the
FJR1300. I couldn't find any Honda Moly 60 paste prior to the first
tire change, so used the Mobile 1 that was on hand. Since then I have
found and bought some and use it instead.
8. Reassemble in reverse order, being careful
to line up the splines so they slip right in without being forced. Be
sure to also clean and grease the splines on the rear drive where they
mate to the rear wheel. Use care when reassembling the rear spline's
spring, oil seal, and circlip.
9. Torque the 4 acorn nuts
on the rear hub to 42 Nm (30 ft-lbs).
10. Do not torque the acorn
nuts down until after the rear wheel has been reinstalled and the axle
torqued to the proper specifications. This will help assure a better
alignment of the assembly.
11.
Go ahead and swap out rear drive ("pumpkin") lube while you're
in there. You don't have to with the above expensive Yamaha gear oil,
but why not? It's fast and easy.
12. Perform the Universal
Joint Service too while here. It's easy.